Hi everyone,
In this article, we will walk you through the steps of provisioning an Amazon Web Services (AWS) Elastic Compute Cloud (EC2) instance with ubuntu as the operating system and configuring nginx on it. To get started, you will need an AWS account. AWS offers a free tier for newly created accounts, so you can try out the cloud services without any cost.
Intro to Nginx
Nginx is open source software for web serving, reverse proxying, caching, load balancing, media streaming, and more. It started out as a web server designed for maximum performance and stability.
It was designed for maximum performance and stability, making it one of the most popular and widely used software of its kind. If you're in the IT field, there's a high chance you'll encounter Nginx at some point in your career.
Lets get started
To begin, log in to your AWS account and click on "EC2".

Then, click the "Launch Instance" button to open the instance launch wizard.

Select server OS
Then in the launch instance give a name and an os image for your server to continue. Here I am naming this as codehirise server and choosing ubuntu 22.04 os.

Next, you'll need to select an instance type. For this tutorial, we'll choose t2.micro as it falls under the free tier, but you can choose any type you prefer. Keep in mind that the cost will vary based on the instance type you choose. To learn more about AWS instance types, visit the aws instance types doc .

Select ssh Key pair
In order to connect to the instance we are about to create, we need a SSH key pair.
We can create a new key pair or select a previously created key pair.
I will create a new key pair with default values for this tutorial.

Provide a name for your key and click "create key pair" the private key will be automatically downloaded.

Configure networking
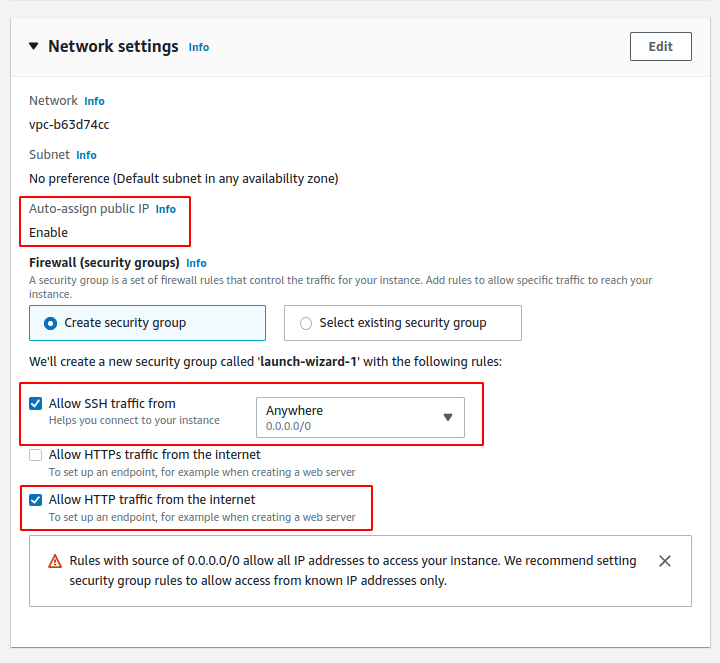
Following the network settings, we need to enable Allow HTTP traffic from the internet which will be used to connect to NGINX after it has been deployed.
We also need to Allow SSH traffic from Anywhere which is needed to connect to the instance via SSH.
By default, a provisioned instance has a public IP address which we use to connect to the server. and also when an AWS account creates it will create a default VPC (Virtual private cloud) to simplify the experience for new uses, here that VPC is used as default. And also this instance will be provisioned on AWS us-east-1 region .

Configure storage
Finally, for storage, I will leave it as the default setting which is suitable for this tutorial, then click the launch instance button to provision your AWS EC2 instance.

If everything goes well, you'll see this screen with launch success.
After that click on instance id to view your newly created instance.

You will see your newly created instance in a running status. Note that it takes some time to get from the pending to running state.

Connecting to the instance
Once we have successfully installed the server, we can connect to it using SSH.
Navigate to the directory where you have the SSH private key which we downloaded earlier.
Before we can actually ssh in to the server we need to reduce permissions in our ssh key.
So to do that run
chmod 400 <your key >

Then run to connect to the instance using SSH.
ssh -i "your key name .pem" ubuntu@instance_public_ip
Here we specify ubuntu as username since that is the default username for Ubuntu OS which we selected in earlier steps.
we can also specify Public DNS for ssh isted of public ip os the server.
After connecting to the instance for the first time you will get a prompt to continue. Type yes to continue

Voila, you are now on the server.
Install Nginx on an Ubuntu server
Installing Nginx is pretty straight forward.
First, we need to update the 'apt' repositories since this is a fresh Ubuntu server. There might be new updates in the repositories.
Here apt is ubuntu default pachage manager.
Run
sudo apt update

After that run
And press y in the confirmation propmt
sudo apt install nginx

After installation run
sudo systemctl status nginx

Now we will visit the public IP address of our instance to see Nginx in action.

Nginx will bind by default to port 80 in the server , and since we opened that port when provisioning instance we are able to see this nginx welcome page by visiting public ip from web browser.
there can be aditional configurations in os level like firewalls to open ports , but in this ubuntu image it is not nessasary and port 80 is opend by default in os level.
As the final step we need to remove created resources to avoid getting billed.
Here by terminating instace it will also remove ebs root volume as default action which will incur cost if not deleted.

Thank you for reading.
CodeHiRise
All rights reserved 2025